
Desserts

Red Velvet Brownies with Chocolate Frosting That Will Blow Your Mind!

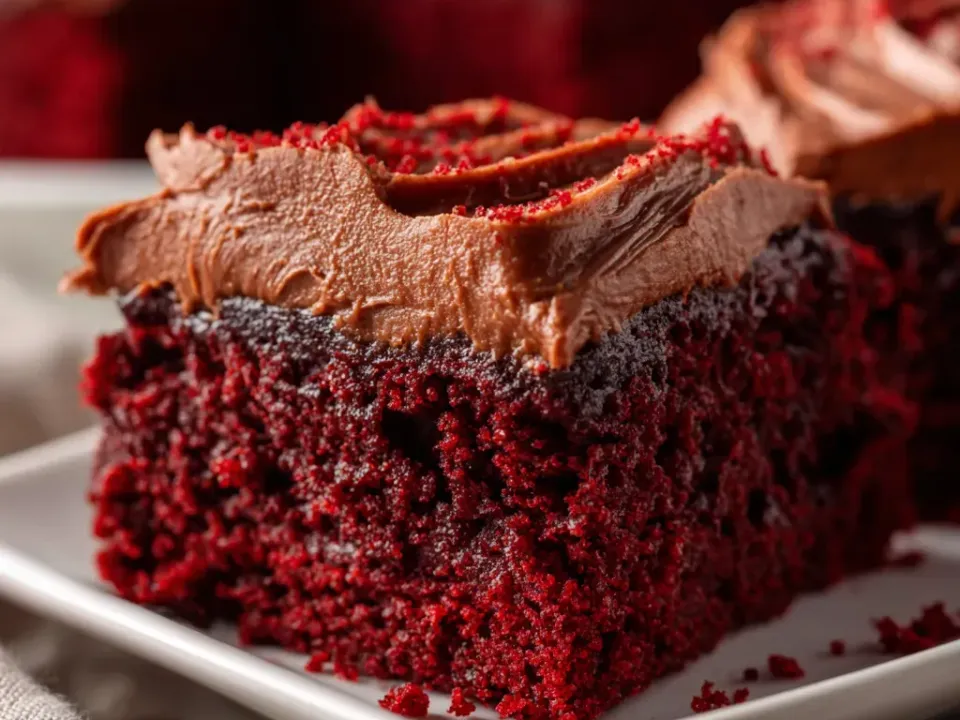
Red Velvet Brownies with Chocolate Frosting have become my absolute obsession this winter! There’s something magical about that perfect balance of cocoa-kissed crimson batter transforming into fudgy squares topped with silky chocolate frosting. Every time I make these for gatherings, they vanish within minutes—leaving nothing but crumbs and requests for the recipe. The vibrant color against that decadent frosting creates a showstopping treat that’s both visually stunning and irresistibly delicious. If you’ve been searching for a dessert that combines the classic appeal of red velvet cake with the fudgy texture of your favorite brownie, this recipe is about to become your new favorite.

Recipe

Why You’ll Love These Red Velvet Brownies with Chocolate Frosting

Perfect Texture & Flavor Combination

The magic moment happens when you bite into these brownies—that perfect balance between cake-like structure and fudgy interior that melts on your tongue. The subtle cocoa notes in the red velvet batter provide just enough chocolate flavor without overwhelming, while the vibrant color makes them instantly recognizable. I’ve tested countless versions to get the right ratio of buttermilk to cocoa powder, creating that signature red velvet tang that pairs perfectly with the rich chocolate frosting. These aren’t just brownies; they’re an experience of contrasting textures and complementary flavors that dance together beautifully.

Impressive Yet Simple to Make

Don’t let their elegant appearance fool you—these red velvet brownies with chocolate frosting are surprisingly straightforward to prepare! The batter comes together in just one bowl (fewer dishes is always a win in my kitchen), and the frosting requires minimal effort for maximum impact. I love that these brownies elevate any occasion while requiring basic pantry ingredients and standard baking equipment. Even my teenage niece mastered these on her first try! The dramatic color contrast between the ruby-red base and glossy chocolate topping creates a professional-looking dessert that will have everyone convinced you spent hours in the kitchen.

Essential Tips & Tricks

Achieving the Perfect Red Velvet Color

The signature red hue is crucial for authentic red velvet brownies with chocolate frosting. My secret? Use gel food coloring rather than liquid for more intense color without affecting the batter consistency. Start with 1-2 teaspoons and adjust as needed—different brands vary in potency. Natural alternatives like beet powder work too, though the color will be more subtle. The reaction between cocoa powder, vinegar, and buttermilk enhances the red tones, so don’t skip these ingredients! Room temperature ingredients blend more evenly, creating that consistent ruby color throughout your brownies that makes them instantly recognizable.

Frosting Techniques for Bakery-Quality Results

For that bakery-perfect finish on your red velvet brownies with chocolate frosting, patience is key! Allow your brownies to cool completely before frosting—even a hint of warmth will cause the frosting to melt. I like to refrigerate my brownies for 30 minutes before frosting for cleaner cuts. For ultra-smooth frosting, warm your offset spatula under hot water and dry it between strokes. Create decorative swirls by using the back of a spoon to make gentle peaks, or keep it sleek and smooth for a modern look. A light dusting of cocoa powder or red velvet cake crumbs on top adds a professional finishing touch.

Serving Ideas & Creative Variations

Elegant Presentation Suggestions

Transform these red velvet brownies with chocolate frosting into showstopping desserts by cutting them into precise squares and placing each on a small dessert plate with a light dusting of powdered sugar. For dinner parties, add a quenelle of vanilla bean ice cream and a few fresh raspberries alongside. I love creating a dessert board with these brownies as the centerpiece, surrounded by chocolate-dipped strawberries and cinnamon sugar tortilla chips for textural contrast. For gifting, stack them in a clear box tied with ribbon, separating layers with parchment paper to preserve that perfect frosting. The vibrant color makes them especially festive for Valentine’s Day or Christmas gatherings.

Flavor Twists on the Classic Recipe

While traditional red velvet brownies with chocolate frosting are divine, experimenting with variations keeps things exciting! My favorite twist is adding 1/2 cup of mini chocolate chips to the batter for pockets of melty chocolate throughout. For a tangy contrast, swap the chocolate frosting for cream cheese frosting with a hint of lemon zest. Coffee lovers can add 1 tablespoon of espresso powder to the frosting for a mocha variation. White chocolate chips folded into the batter create beautiful contrast against the red. For special occasions, try layering cheesecake batter between two red velvet layers before baking for an indulgent marbled effect.

Storage & Troubleshooting Guide

Keeping Your Brownies Fresh

The moisture retention in red velvet brownies with chocolate frosting makes them perfect for make-ahead treats. Store them in an airtight container at room temperature for up to 3 days—the frosting actually helps seal in moisture! For longer storage, refrigerate for up to a week, but always bring to room temperature before serving to restore that fudgy texture. These brownies freeze beautifully for up to 3 months; just separate layers with parchment paper and thaw overnight in the refrigerator. I like to individually wrap portions for grab-and-go treats that defrost in about an hour at room temperature.

Fixing Common Baking Issues

If your red velvet brownies with chocolate frosting aren’t turning out perfectly, don’t worry—simple adjustments can help! For overly cakey brownies, reduce the flour by 2 tablespoons next time and don’t overmix the batter. Too fudgy? Add an extra egg for more structure. If the color isn’t vibrant enough, your cocoa powder might be too dark—try using a regular (not Dutch-processed) variety. Cracked tops usually indicate too high an oven temperature; consider getting an oven thermometer to check accuracy. For frosting that’s too thick, add a splash of milk; too thin, incorporate more powdered sugar until you reach that perfect spreadable consistency.

Frequently Asked Questions

Can I make red velvet brownies without food coloring?

Yes! Use 2 tablespoons of beet powder instead of food coloring. The color will be more burgundy than bright red, but you’ll get a natural version with the same delicious flavor and no artificial ingredients.

How do I know when my red velvet brownies with chocolate frosting are done baking?

A toothpick inserted in the center should come out with a few moist crumbs (not wet batter). The edges will be set while the center remains slightly soft. Don’t overbake or you’ll lose the fudgy texture.

Can I make these brownies gluten-free?

Absolutely! Replace the all-purpose flour with a 1:1 gluten-free baking blend. Add 1/4 teaspoon xanthan gum if your blend doesn’t include it for the best texture.

Why did my frosting turn grainy?

Grainy frosting usually results from adding powdered sugar to warm butter. Ensure your butter is at room temperature (not melted) and sift your powdered sugar before incorporating it slowly.

Can I prepare these brownies in advance for a party?

Definitely! Make them 1-2 days ahead and store in an airtight container. The flavor actually improves overnight as the ingredients meld together.

Final Thoughts

These red velvet brownies with chocolate frosting have become my signature dessert for good reason—they combine visual drama with incredible flavor in every bite. The contrast between that vibrant ruby base and rich chocolate topping creates something truly special that stands out on any dessert table. Whether you’re baking for a holiday gathering, special celebration, or simply treating yourself on a cozy evening, these brownies deliver that perfect balance of indulgence and elegance. Find more inspiration for your baking adventures on my Pinterest collection where I share new recipe ideas weekly!