
Seven ingredients and no oven. Fifteen minutes of work and two hours in the fridge before it will cut.
There is no cocoa and no brown chocolate in it. The eighteen ounces of white chocolate are structural — they are what makes fudge rather than a soft filling.
Why This Recipe Works
- Melting over low heat keeps white chocolate from seizing or scorching.
- Condensed milk supplies both the sugar and the moisture a fudge needs to set.
- Adding the vanilla off the heat keeps its aroma.
- Folding most of the candy through means it is suspended rather than sitting on top.
- Two hours of chilling is what lets it cut into clean squares.
Ingredient Notes
- White chocolate
- Eighteen ounces chopped. It is the setting base — no brown chocolate and no cocoa appear anywhere in this recipe.
- Sweetened condensed milk
- A fourteen-ounce can. With the white chocolate it is the whole structure of the fudge.
- Pastel candy pieces and eggs
- Half a cup chopped and half a cup whole. Generic pastel candy-coated chocolate — no particular brand is needed.
- Nonpareil sprinkles
- Two tablespoons over the surface. Visible on the finished squares alongside the eggs.
How to Make It
Line the pan
Line an 8-inch square pan with parchment.
Melt low, to smooth and pale yellow
Melt white chocolate, condensed milk, and butter together over low heat, stirring until smooth and pale yellow. Remove from heat and stir in vanilla.
Most of the candy folded through
Fold in most of the chopped pastel candy pieces, then spread into the pan.
Eggs and sprinkles pressed on top
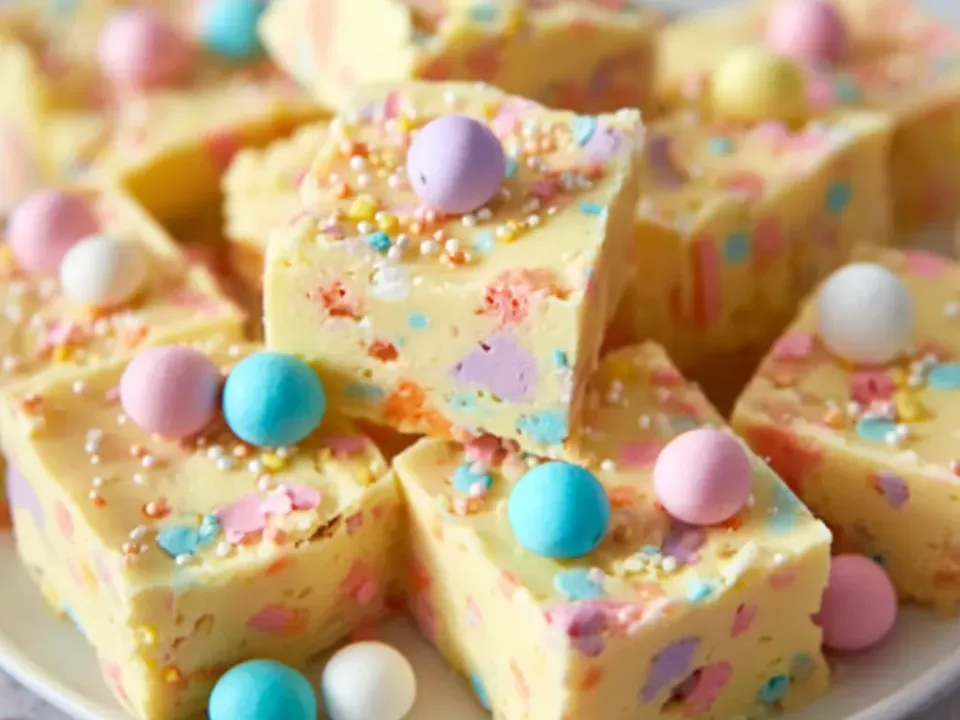
Press whole pastel speckled candy eggs and remaining candy pieces over the surface and finish with nonpareil sprinkles.
Two hours, then clean squares
Chill at least 2 hours until firm enough to cut into clean squares.
Generic candy — any brand works
Use generic pastel candy-coated chocolate eggs; no particular brand is needed.
Five Points Between Melted and Cut
This is a pale, firm, cuttable Easter fudge. Each checkpoint below is one of the things that makes it so.
The melt
LOW heat, stirred until SMOOTH AND PALE YELLOW.
18 oz of white chocolate with a 14 oz can of condensed milk and 1 tbsp of butter. White chocolate has no cocoa solids and a lot of milk solids, so it scorches and seizes at temperatures dark chocolate tolerates. Low and stirred is the whole technique, and pale yellow is the colour to stop at.
The vanilla
OFF the heat, 1 tsp stirred in.
A small point with a real reason: vanilla is volatile, and stirred into a pan still on the burner most of its aroma leaves with the steam.
The candy going in
MOST of 1/2 cup of chopped pastel pieces FOLDED through - not all of it.
The candy should be SUSPENDED THROUGH the fudge as well as sitting on top. Folding most of it in is what puts colour in the cut face of every square; holding some back is what covers the surface. Folded off the heat, too, so the sugar shells keep their colours instead of bleeding.
The surface
Whole speckled eggs and the remaining pieces PRESSED IN, then 2 tbsp of nonpareils.
Pressed rather than scattered, while the fudge is still soft - laid on a set surface they fall off the first square that is cut. And the eggs are GENERIC: step 6 states that no particular brand is needed.
The set
AT LEAST 2 hours, until firm enough to cut CLEAN SQUARES.
The stopping condition is the cut, not the clock. This fudge has to be firm enough to slice. In warm conditions the finished fudge stays refrigerated; nothing here contains raw egg.
Success Tips
- Keep the heat low — white chocolate scorches faster than dark.
- Fold the candy in once the mixture is off the heat so the shells keep their colour.
- Give it the full two hours; cut early, the squares have soft edges.
Serving Ideas
Twenty-four squares on a white plate, pale yellow and shot through with pastel pink, blue and purple candy pieces, topped with speckled candy eggs and nonpareil sprinkles.
Frequently Asked Questions
Does it need a particular brand of candy egg?
No. Step 6 says to use generic pastel candy-coated chocolate eggs — no particular brand is needed.
There is no chocolate in it?
No brown chocolate and no cocoa. White chocolate is the setting base, which is why the fudge is pale yellow rather than dark.
How is this different from the Easter cheesecake dip?
That one is soft and scoopable and never sets. This is a fudge, cut into clean squares after two hours in the fridge.