
Dinner
Fudgy Red Velvet Crinkle Cookies | Festive, Chewy, and Easy

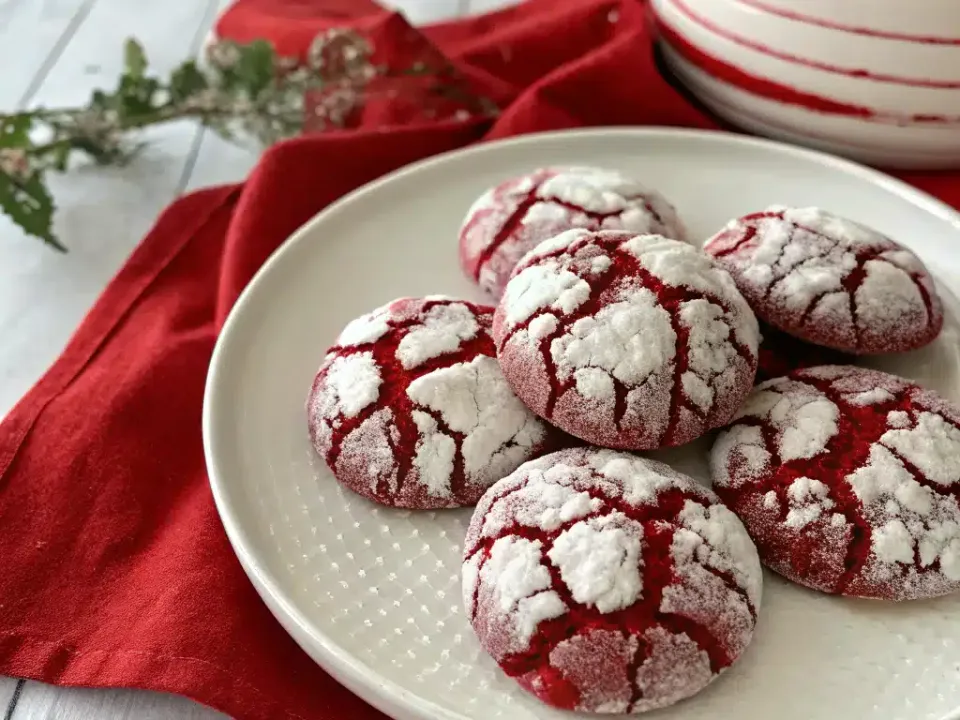
Every December, I bake a parade of cookies for our neighborhood swap, but these fudgy red velvet crinkle cookies always disappear first. They’re deeply cocoa-kissed with that classic red velvet tang and a soft, brownie-like center that makes everyone reach for seconds. The snow-dusted finish looks dramatic without any fuss, so the cookies feel special even on a busy weeknight. Over the years, I’ve perfected a few tricks—chilling the dough, a double sugar coat, and a careful bake—that guarantee bold crinkles and tender chew. This is the festive cookie you’ll be proud to gift, plate up for parties, and sneak from the cooling rack before they’re even cool.
Table of Contents
???? Recipe Card
Why These Fudgy Red Velvet Crinkle Cookies Steal the Holiday Spotlight
There’s a reason red velvet bakes dominate during the holidays: they’re equal parts cozy nostalgia and show-stopping color. These Red Velvet Crinkle Cookies bring everything you love about red velvet cake—gentle cocoa, vanilla warmth, and that signature tang—into a fudgy, handheld bite that’s tailor-made for cookie exchanges and dessert boards. The hallmark of a great crinkle cookie is contrast: a soft, brownie-like center surrounded by dramatic, snow-like fissures of powdered sugar. This recipe maximizes those crinkles with a few key techniques and ingredients that keep the cookies plush without sacrificing structure.
The flavor base starts with unsweetened cocoa powder for depth, vanilla to round things out, and a touch of distilled white vinegar—an essential red velvet element that adds a subtle tang and helps the leaveners lift. To achieve the fudgiest texture, we use both softened butter and a bit of neutral oil; the butter brings flavor while the oil keeps the crumb moist for days.
Color matters for visual impact. A gel or concentrated liquid food coloring yields a deep crimson hue that won’t fade while baking. Don’t worry: the coloring won’t affect flavor when used as directed. And because red velvet loves a creamy counterpart, a handful of white chocolate chips is optional but delightful—melty pools that punctuate the cocoa and vanilla.
The snowcapped look comes from rolling well-chilled dough balls first in granulated sugar and then in confectioners’ sugar. The granulated sugar creates a thin barrier that helps the powdered sugar sit on top without dissolving, so your cookies emerge with dramatic cracks instead of a muted dusting.
On a festive dessert tray, these cookies shine alongside classics like peppermint bark or simple fudge. If you want an easy candy to pair with your cookie tins, try this no-fuss 3-Ingredient Candy Cane Fudge. Together, they make a polished, giftable duo with big holiday flavor and a fraction of the effort.
Step-by-Step: How to Make Red Velvet Crinkle Cookies with Perfect Cracks
Set yourself up for success by starting with room-temperature ingredients. When butter and eggs are slightly warm, they emulsify more smoothly, which leads to a uniform crumb and even rise. A kitchen scale is helpful for accuracy, especially with flour and cocoa.
1) Whisk your dry mix: In a medium bowl, whisk all-purpose flour, unsweetened cocoa powder, baking powder, a pinch of baking soda, and salt. Cocoa can clump; take a few extra seconds to break it up thoroughly for an even bake.
2) Cream with intention: In a large bowl, beat softened unsalted butter with granulated sugar and light brown sugar until pale and fluffy, about 2–3 minutes. This step traps air, helping your cookies puff and crackle properly. Beat in a splash of neutral oil. The oil adds moisture that keeps the centers fudgy after cooling.
3) Layer flavor: Beat in eggs one at a time until fully incorporated, then add vanilla and a teaspoon of distilled white vinegar. The vinegar brightens the cocoa and works with the leaveners to create that pillowy, crinkled top.
4) Color control: Add red gel food coloring a little at a time until you reach a vibrant, deep red. Gel coloring is potent, so you’ll use less for stronger results than with standard liquid color.
5) Combine with care: Add the dry ingredients to the wet on low speed until just combined; overmixing can toughen the cookie. Fold in white chocolate chips if using. The dough should be soft but workable.
6) Chill for confidence: Cover the bowl and chill for at least 45 minutes (or up to 48 hours). Chilling firms the dough, prevents excessive spreading, and deepens the flavors. If you chill overnight, let the dough sit at room temperature for 10–15 minutes to become scoopable again.
7) Double-coat for dramatic crinkles: Prepare two shallow bowls—one with granulated sugar and the other with confectioners’ sugar. Scoop dough into 1.5-tablespoon portions (a #40 scoop works well), roll each into a ball, coat generously in granulated sugar, then coat thoroughly in confectioners’ sugar. A thick powdered sugar layer is key to bold, lasting contrast.
8) Bake precisely: Arrange on a parchment-lined baking sheet, spacing well. Bake in a 350°F (175°C) oven for 10–12 minutes. Look for edges that are set and centers that are puffed and slightly underdone; the crinkles should be prominent. Avoid overbaking—cookies continue to set as they cool, and overbaking erases that brownie-like center.
9) Cool with patience: Let cookies rest on the sheet for 5 minutes, then transfer to a rack to cool completely. If needed, dust with additional confectioners’ sugar after cooling.
Pro tips for consistent results:
– Flour matters: Spoon and level flour into the cup or use a scale to avoid dry, cakey cookies.
– Pans count: Light-colored aluminum sheets and parchment promote even baking and cleaner bottoms.
– Batch timing: Work in small batches, keeping unbaked dough covered and chilled so it stays firm for rolling and coating.
– Visual cues over time: Ovens vary. Your first batch is a test—aim for cookies that are just set at the edges with soft centers and defined cracks.
Variations, Make-Ahead, and Storage Tips for Busy Festive Schedules
One recipe, many moods—that’s the beauty of red velvet cookies. Once you master the base, small tweaks deliver fresh flavors and textures.
Flavor twists to try:
– Peppermint White Chocolate: Swap in peppermint chips or add 1/2 teaspoon peppermint extract. Finish with crushed candy cane for sparkle.
– Cream Cheese Glaze: Whisk softened cream cheese with confectioners’ sugar, a pinch of salt, and a splash of milk until drizzly. Drizzle over cooled cookies for that classic red velvet–cream cheese pairing.
– Mocha Velvet: Add 1 teaspoon instant espresso powder to the dry ingredients to deepen the cocoa notes.
– Beets for Color: For a natural hue, use beet powder (1–2 teaspoons) along with a touch of gel color if needed. You’ll get a more muted, earthy red with zero bitterness.
– Gluten-Free Swap: Use a quality 1:1 gluten-free baking blend and let the dough rest in the fridge for an extra 15–20 minutes to hydrate the starches.
Make-ahead plans that work:
– Chill the Dough: The dough keeps covered in the fridge for up to 48 hours. Scoop directly from chilled and roll in sugars right before baking so the coating stays bright.
– Freeze the Dough Balls: Scoop and roll dough into balls, freeze on a tray until firm, then store in a zip-top bag up to 2 months. Roll in granulated and powdered sugar straight from frozen and add 1–2 minutes to the bake time.
– Bake and Freeze: Baked cookies freeze beautifully. Cool completely, layer with parchment in an airtight container, and freeze up to 2 months. Thaw at room temperature and re-dust with confectioners’ sugar if needed.
Creative serving and gifting:
– Sandwich Cookies: Pair two cookies with a thin layer of buttercream, marshmallow fluff, or thick caramel. A slow-cooker caramel is especially simple—make a batch of slow cooker dulce de leche and spread a teaspoon between two cookies for an irresistible treat.
– Cookie Charcuterie Boards: Arrange your crinkles with a mix of textures—crisp biscotti, chewy ginger cookies, and a few dipped fruits—so every bite on the board feels intentional. Include a small sifter of powdered sugar to refresh the look just before serving.
Storage guidelines:
– Room Temperature: Store cookies in an airtight container at cool room temperature for 4–5 days. Slip in a piece of parchment to prevent sticking if the environment is humid.
– Humidity Control: To protect the powdered sugar finish, add a small packet of food-safe desiccant or a teaspoon of dry rice wrapped in cheesecloth to the container.
– Re-Crinkle Trick: If the tops look dull after storage, dust lightly with confectioners’ sugar just before serving for a fresh “snow” effect.
Serving Ideas, Pairings, and Troubleshooting for Bakery-Style Results
Setting a festive scene is half the joy of holiday baking. These cookies are naturals on a dessert table with hot cocoa, coffee, or even a celebratory glass of bubbly. For New Year’s gatherings, I like to plate them with tart berries (raspberries or pomegranate arils) to contrast the sweetness and accent the red hue. On game days or casual potlucks, balance the dessert spread with a few savory crowd-pleasers; a warm, creamy option like this slow cooker jalapeño corn dip keeps the table interesting and rounds out your menu.
Troubleshooting common issues:
– Cookies Spread Too Much: Your dough was likely too warm or under-measured on flour. Chill the dough longer and confirm your flour measurement. If still spreading, add 1–2 tablespoons flour and test another cookie.
– Crinkles Don’t Show: The powdered sugar may be dissolving. Be sure to double-coat—first in granulated sugar, then a heavy layer of confectioners’ sugar—and bake immediately after coating. Work with chilled dough and avoid overcrowding the pan.
– Dry or Cakey Texture: Overbaking is the usual culprit. Pull the cookies when edges are just set and centers are soft and puffy. Measure flour carefully and don’t overmix once the flour goes in.
– Bitter Flavor: Using too much liquid food coloring can leave a harsh aftertaste. Switch to gel color and add gradually. Also check your cocoa—Dutch-process will taste smoother, while some natural cocoas can lean sharper.
– Flat Tops, Minimal Lift: Cream your butter and sugars fully to incorporate air, and make sure your baking powder and baking soda are fresh. The vinegar + leavener combo needs active agents to do its job.
Scaling for crowds and timing:
– Double the Recipe: Mix in a large bowl and chill the dough in two shallow containers for faster cooling. Bake on two racks, rotating halfway, to keep batches uniform.
– Smart Staging: Scoop the next tray while one is in the oven, keeping the remaining dough covered and chilled so every batch crinkles the same.
Presentation polish:
– Sift-and-Serve: Right before serving, give cookies a quick snowfall of sugar to revive that fresh-baked, high-contrast look.
– Color Coordination: Plate on matte white or slate boards so the crimson pops. Add rosemary sprigs or edible gold stars for instant holiday elegance without extra sweetness.
Conclusion
Fudgy Red Velvet Crinkle Cookies bring timeless holiday charm in a format that’s easy to bake, stunning to serve, and guaranteed to draw compliments. With a balanced cocoa profile, a whisper of tang, and brownie-soft centers, they’re everything you want from a celebration cookie. The method—chill, double-coat, bake just until set—delivers those sought-after crinkles every time. Whether you’re packing tins, building a dessert board, or sneaking a warm cookie with your evening cocoa, this recipe will become your festive classic for years to come.
If you made these Fudgy Red Velvet Crinkle Cookies, leave a rating and a comment to share your tips and twists. Snap a photo and tag your bake—your holiday board might inspire someone else’s new favorite cookie! For more cozy, time-saving recipes, subscribe to get new ideas delivered to your inbox.
FAQ
Can I make these cookies without food coloring? Yes. The flavor won’t change if you omit the food coloring. For a natural alternative, try beet powder for a muted red or simply enjoy them as cocoa crinkle cookies.
How do I keep the powdered sugar from melting into the cookies? Work with well-chilled dough, roll first in granulated sugar, then generously in confectioners’ sugar, and bake immediately after coating. Store in a cool, dry container and re-dust before serving if needed.
Can I freeze the dough or baked cookies? Absolutely. Freeze portioned dough balls up to 2 months and bake from frozen, adding 1–2 minutes. Baked cookies also freeze well; thaw at room temperature and re-dust with sugar before serving.
Why add vinegar to red velvet cookies? Vinegar adds classic red velvet tang and reacts with baking soda for lift, helping create puffy centers and pronounced crinkles without making the cookies taste acidic.