
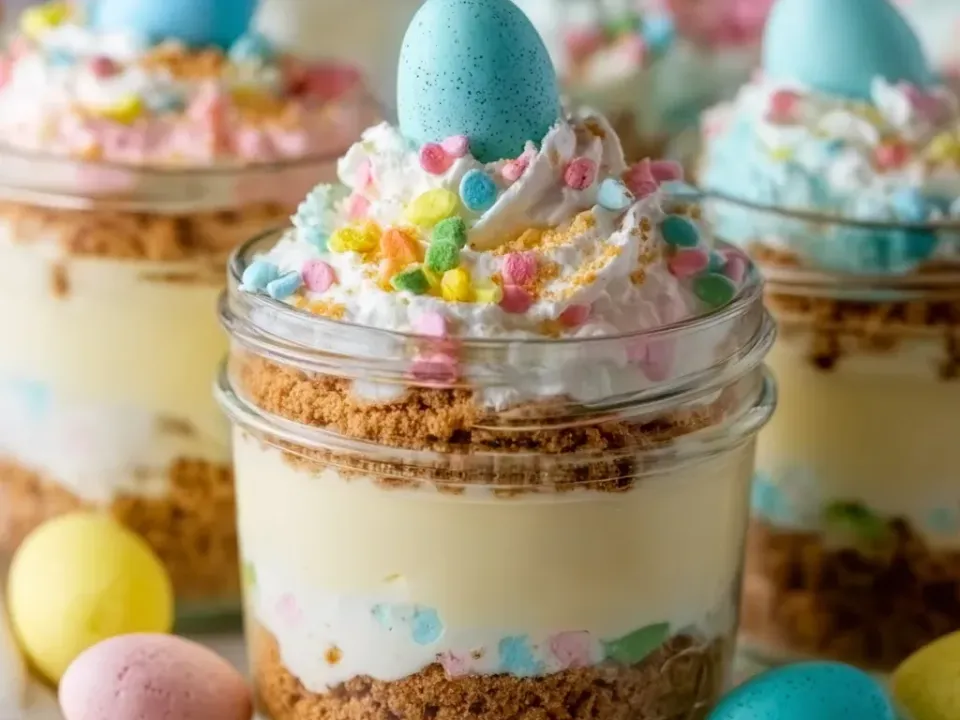
Ten ingredients, twenty minutes of work and two hours of chilling. Nothing is cooked.
The jars are clear for a reason: every layer is meant to be seen from the side before a spoon goes anywhere near it.
Why This Recipe Works
- Melted butter binds the crumb enough to stay as a defined layer in glass.
- Beating the cream cheese smooth before folding avoids lumps in a set filling.
- Folded whipped cream lightens the filling so it stays spoonable rather than dense.
- Two hours of chilling firms the layers without setting them hard.
- Piping the cream on at the end keeps it distinct from the filling underneath.
Ingredient Notes
- Graham-cracker crumbs
- A cup and a half with four tablespoons of melted butter, divided across two layers in each jar rather than pressed into one base.
- Cream cheese
- Sixteen ounces, softened. Softened matters more here than in a baked cheesecake — nothing later will smooth out a lump.
- Whipped heavy cream
- A cup, folded into the filling, plus half a cup kept back for piping on top. Two jobs, two stages.
- Pastel candy pieces, nonpareils and speckled eggs
- Generic candy throughout — no particular brand is needed. One speckled egg tops each jar.
How to Make It
Crumb bound with melted butter
Mix graham crumbs with butter.
Filling beaten smooth, then lightened — no shell eggs
Beat cream cheese, powdered sugar, and vanilla until smooth, then fold in whipped cream. No shell eggs are used.
Crumb, filling, crumb, filling — in clear glass
Layer each clear jar with crumb, cheesecake filling, a second crumb layer, and more filling.
Two hours, firm but still spoonable
Chill at least 2 hours so the filling firms but remains spoonable.
Piped cream, candy, nonpareils, one egg
Pipe whipped cream on top and finish with generic pastel candy pieces, nonpareils, and one speckled candy egg.
Nothing brown and nothing fruity
Do not add fruit, cocoa, or chocolate sauce.
Read the Jar From the Bottom Up
What makes this no-bake cheesecake its own dessert is the thing you can see through the glass: it is built in bands, and the crumb appears TWICE. Here is the stack in the order it is spooned in.
The top - piped, not folded in
1/2 cup of whipped cream held back from the start and PIPED ON as its own layer above the set filling, then generic pastel candy pieces, 1 tbsp of nonpareils, and ONE speckled candy egg per jar. Any brand of candy works. And step 6 closes it: no fruit, no cocoa, no chocolate sauce, which is why nothing brown appears anywhere in the glass.
Band 4 - more filling, then 2 hours cold
The remaining filling over the second crumb, then AT LEAST 2 HOURS chilled. The endpoint is stated precisely: FIRM BUT STILL SPOONABLE. Not set hard - nothing here is ever unmoulded, and a jar you have to chip at has been chilled past its purpose.
Band 3 - crumb AGAIN
The rest of the crumb, as a SECOND distinct layer through the middle. This is the layer that defines the recipe: the crumb goes in two separate layers rather than only as a base, and that visible layering is what makes the jar. Without this band it is a cheesecake in a glass; with it, it is this dessert.
Band 2 - the set cream filling
16 oz of cream cheese beaten smooth with 3/4 cup powdered sugar and 1 tsp vanilla, then 1 cup of WHIPPED heavy cream FOLDED in. Folded rather than beaten: the air is what keeps it spoonable after chilling instead of dense. NO SHELL EGGS go into this at any point - the eggs in the recipe's name are candy, and they are all on top.
Band 1 - golden crumb base
Part of 1 1/2 cups of graham crumbs bound with 4 tbsp of MELTED butter. The butter is what holds the crumb together as a defined band rather than a loose scatter that drifts up into the filling. It is spooned in rather than pressed hard - this base is not supporting an unmoulded cake, only sitting at the bottom of a jar.
Success Tips
- Soften the cream cheese properly; cold cheese beats to lumps that never disperse.
- Spoon each layer to the glass edge so the bands read cleanly from outside.
- Pipe the cream just before serving so it stays high above the filling.
Serving Ideas
Six clear glass jars showing their bands from the side — golden crumb, pale filling, crumb again, filling — under piped cream with pastel candy pieces, nonpareils and a single speckled egg on each.
Frequently Asked Questions
Why two crumb layers instead of one base?
Because the jar is clear and the layering is the dessert. A second band of crumb through the middle is what you see from the side, and it is what makes this different from a set cheesecake.
Are there raw eggs in the filling?
No shell eggs are used at all. The eggs in the name are candy, on top. Keep the jars refrigerated at 40 degrees Fahrenheit or below.
Can I add chocolate sauce or fruit?
No — step 6 rules out fruit, cocoa and chocolate sauce. The only colour on the jar comes from the candy.