
Lunch

Crispy Air Fryer Blooming Onion: Irresistibly Crunchy & Easy!

Crispy Air Fryer Blooming Onion: Irresistibly Crunchy & Easy!

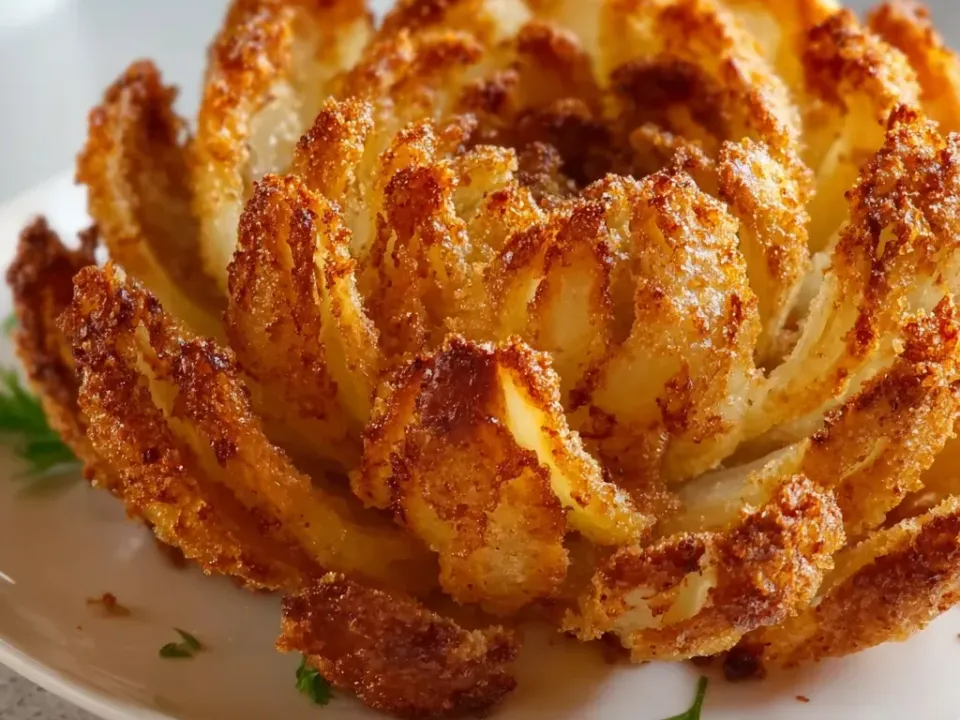
Crispy Air Fryer Blooming Onion – that magical restaurant appetizer we all fight over – has finally found its way into my home kitchen, and I couldn’t be more thrilled to share this healthier version with you! The first time I made this showstopper at home, my kitchen filled with that irresistible savory aroma that had my family hovering nearby, waiting for that first crispy, golden bite. Using the air fryer cuts down on oil while still delivering that satisfying crunch we crave. If you’ve been hesitant to try making a blooming onion at home, this foolproof method will change your mind forever. Trust me, it’s easier than you think!

Recipe

Why You’ll Love This Crispy Air Fryer Blooming Onion

A Healthier Take on a Restaurant Favorite

The traditional blooming onion is delicious but often leaves me feeling a bit guilty after indulging. This air fryer version uses significantly less oil while still achieving that perfect golden crust we all crave. I was genuinely shocked the first time I made this – the petals were crispy on the outside, tender on the inside, and the flavor was spot-on! With just a light spray of oil and the magic of circulating hot air, you’ll get all the satisfaction of the deep-fried version with a fraction of the calories. Plus, there’s no messy oil to dispose of afterward!

Impressive Yet Surprisingly Simple

Don’t let the dramatic presentation fool you – creating a blooming onion at home is much easier than it looks! The most challenging part is simply cutting the onion properly, and I’ll walk you through that step by step. The first time I served this at a game day gathering, my friends couldn’t believe I’d made it myself. Their wide eyes as I placed it on the table made all the effort worthwhile! The air fryer does most of the work for you, transforming a humble onion into a conversation-starting centerpiece that everyone will gather around. It’s the perfect way to elevate any casual get-together.

Essential Tips & Tricks

Selecting and Preparing Your Onion

The foundation of a perfect blooming onion starts with choosing the right onion. Look for large, round sweet onions like Vidalia or Spanish varieties with flat bottoms that will stand upright. I once tried using a regular yellow onion from my pantry and while it worked, the sweet varieties truly make a difference in flavor. When cutting, leave about ½ inch intact at the root end – this keeps your “bloom” together. I find it helpful to place the onion root-side up on a cutting board, make the first cut down the center, then rotate and continue making cuts between the existing ones until you have 16 sections.

Coating Techniques for Maximum Crispiness

The secret to achieving that restaurant-quality crunch lies in your battering technique. After cutting, gently open the “petals” and rinse under cold water to remove any loose pieces. Pat completely dry – moisture is the enemy of crispiness! For an extra crispy exterior, I recommend double-dipping: first in the seasoned flour mixture, then in the egg wash, and finally back in the flour mixture again. When I’m feeling extra, I’ll refrigerate the coated onion for 15-20 minutes before air frying, which helps the coating adhere better and creates even more texture.

Serving Ideas & Creative Variations

Dipping Sauces That Elevate Your Blooming Onion

While the classic blooming onion sauce (a spicy mayo-horseradish blend) is always a winner, experimenting with different dipping options truly takes this appetizer to new heights. My family’s current favorite is a sriracha-honey mayo that brings just the right balance of heat and sweetness. For a tangier option, try a Greek yogurt-based sauce with lemon, dill, and garlic. I once served my blooming onion with three different dipping options arranged around it, and it became an interactive tasting experience that had everyone debating their favorites. The cool, creamy sauces provide the perfect contrast to the warm, crispy onion petals.

Flavor Variations to Keep Things Interesting

Don’t be afraid to play with different seasoning blends in your batter! While the traditional paprika-cayenne mix is delicious, I’ve had great success with everything from Italian herbs to taco seasoning. My personal favorite twist is adding a tablespoon of ranch seasoning mix to the flour coating – it adds a tangy, herbaceous note that pairs beautifully with the sweet onion. For heat lovers, try incorporating some chipotle powder like I use in my Crispy Hot Honey Feta Chicken. You can also experiment with different breadcrumbs – panko creates extra crunch, while seasoned breadcrumbs add another layer of flavor.

Storage & Troubleshooting Guide

Reheating for Maximum Crispiness

Let’s be honest – a blooming onion is at its absolute peak freshness right after air frying. However, if you find yourself with leftovers (a rare occurrence in my house!), proper reheating is key. Never microwave unless you enjoy soggy results! Instead, preheat your air fryer to 350°F and reheat for 3-4 minutes. This revives much of the original crispiness without drying out the onion. I like to spritz the leftover petals with a tiny bit of oil spray before reheating to help restore that golden exterior. Remember that the texture won’t be quite as perfect as fresh, but it’s still delicious.

Troubleshooting Common Issues

If your blooming onion isn’t opening properly, the most likely culprit is that you didn’t cut deep enough toward the root end. Make sure you’re cutting about 80% of the way down through the onion, leaving just enough intact to hold it together. Another common issue is uneven cooking – if the outer petals are browning too quickly while the center remains underdone, simply cover the outer sections with small pieces of foil. If your coating is falling off during air frying, the batter might be too thick or the onion too wet. Pat the onion completely dry before coating, and make sure your egg wash isn’t too thin.

Frequently Asked Questions

What size air fryer do I need for a blooming onion?

A 5-quart or larger air fryer works best for a medium-sized blooming onion. For smaller air fryers, consider making mini blooms using smaller onions or just cook the petals separately.

Can I make a crispy air fryer blooming onion ahead of time?

You can cut and prepare the onion up to 8 hours ahead, but for best results, coat and air fry just before serving. The crispy texture significantly diminishes when stored.

What’s the best onion variety to use?

Sweet onions like Vidalia, Walla Walla, or Spanish onions work best. Their natural sweetness caramelizes beautifully and balances the savory coating.

How do I know when my blooming onion is done?

Look for a golden brown exterior and test by gently pulling on an inner petal. It should be tender but still have slight resistance – typically 12-15 minutes at 375°F.

Can I make this recipe gluten-free?

Absolutely! Substitute all-purpose flour with a gluten-free flour blend and use gluten-free breadcrumbs. The crispy texture may vary slightly but still turns out delicious.

Final Thoughts

Creating a crispy air fryer blooming onion at home has become one of my favorite ways to impress guests without spending hours in the kitchen. There’s something magical about transforming a humble onion into a golden, crispy masterpiece that everyone gathers around. The air fryer method makes this indulgent treat more accessible for everyday enjoyment, not just special occasions. I hope you’ll give this recipe a try and experience the joy of pulling apart those perfectly seasoned petals! Don’t forget to share your creations with me on Pinterest – I love seeing your versions of this showstopper!