
Desserts
No Bake Oreo Chocolate Lasagna – Irresistibly Easy & Delicious!
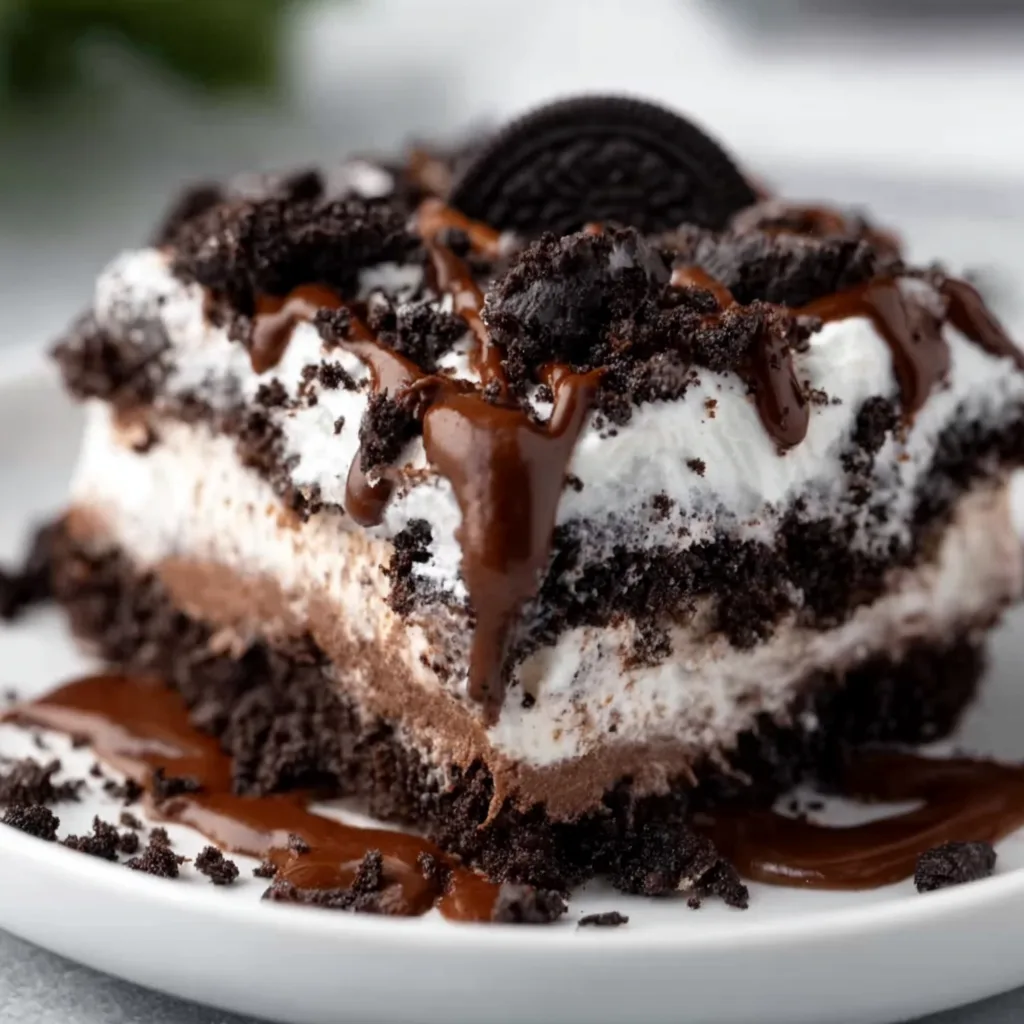
No Bake Oreo Chocolate Lasagna is the dreamy, creamy dessert that’s been stealing hearts at my family gatherings for years. The first time I served this layered masterpiece, my nephew’s eyes grew wide as saucers when he spotted those distinct cookie layers peeking through the velvety cream cheese filling. There’s something magical about the contrast between the crunchy Oreo base and the silky chocolate pudding that makes this dessert irresistible. Perfect for potlucks or special occasions, this no-bake wonder comes together in minutes but disappears even faster!
Recipe
Why You’ll Love This No Bake Oreo Chocolate Lasagna
A Crowd-Pleasing Dessert That’s Actually Simple
The beauty of this No Bake Oreo Chocolate Lasagna lies in its impressive appearance despite requiring minimal effort. I once prepared this for a last-minute dinner party, and guests assumed I’d spent hours in the kitchen! The layered presentation creates that wow factor while the familiar Oreo flavor appeals to everyone from picky toddlers to discerning dessert connoisseurs. The no-bake aspect means your kitchen stays cool in summer, and you avoid the stress of precise baking times. Just layer, chill, and prepare for the compliments to roll in when you slice into those beautiful strata of cookies and cream goodness.
Perfect Make-Ahead Dessert for Any Occasion
This dessert actually improves with time as the flavors meld together in the refrigerator. I often prepare my No Bake Oreo Chocolate Lasagna the evening before a gathering, which not only saves precious day-of preparation time but results in a more developed flavor profile. The cookies soften slightly, absorbing the creamy elements while still maintaining enough texture to create that satisfying contrast. This make-ahead quality makes it perfect for busy holidays, summer picnics, or anytime you need a reliable dessert that won’t have you scrambling at the last minute. Trust me—this is the stress-free showstopper you’ve been looking for!
Essential Tips & Tricks
Mastering the Perfect Oreo Base
Creating the ideal foundation for your No Bake Oreo Chocolate Lasagna starts with properly crushed cookies. I learned the hard way that hand-crushing leads to inconsistent pieces! Use a food processor for uniform crumbs that will hold together beautifully when mixed with melted butter. The butter should be completely melted but not hot—this ensures even distribution without melting the chocolate bits in the cookies. Press the mixture firmly into your pan using the bottom of a measuring cup for a compact base that won’t crumble when sliced. This attention to detail makes the difference between a messy dessert and picture-perfect slices that hold their shape.
Achieving Silky-Smooth Layers Without Lumps
Nothing ruins a beautiful No Bake Oreo Chocolate Lasagna faster than lumpy cream cheese layers! Always start with room temperature cream cheese—I take mine out at least an hour before mixing. Beat it alone first until completely smooth before adding other ingredients. For the pudding layer, whisk the milk and pudding mix vigorously for a full two minutes (I actually time this!) before it starts to thicken. If you’re adding whipped topping, fold it in gently rather than stirring to maintain the air bubbles that create that light, mousse-like texture. These simple techniques ensure each layer maintains its distinct character while blending harmoniously in the finished dessert.
Serving Ideas & Creative Variations
Seasonal Twists on the Classic Recipe
The versatility of No Bake Oreo Chocolate Lasagna makes it perfect for customizing throughout the year. During winter holidays, I add a drop of peppermint extract and crushed candy canes on top for a festive touch. Summer gatherings call for fresh berries scattered between layers—the tartness cuts through the richness beautifully. Fall? Try pumpkin pudding instead of chocolate and cinnamon Oreos for the crust. Spring celebrations shine with pastel-colored white chocolate drizzles and edible flower decorations. Each variation maintains the beloved texture contrast while offering seasonal flavors that keep this dessert feeling fresh and exciting no matter how many times you serve it.
Elegant Presentation Techniques for Special Occasions
Transform your No Bake Oreo Chocolate Lasagna from casual treat to elegant finale with thoughtful presentation. For dinner parties, I portion individual servings in clear glass trifle cups to showcase the beautiful layers—this always earns gasps of delight! Garnish with chocolate curls made by dragging a vegetable peeler across a chocolate bar for an upscale touch. For a more dramatic presentation, prepare the dessert in a springform pan, then release and dust with cocoa powder through a doily for an intricate pattern. Add gold leaf for truly special occasions, or create a chocolate collar around the edges using acetate sheets and melted chocolate. These simple techniques elevate this beloved dessert to restaurant-quality status.
Storage & Troubleshooting Guide
Keeping Your Dessert Fresh and Beautiful
Proper storage is crucial for maintaining the texture and flavor of your No Bake Oreo Chocolate Lasagna. Always cover tightly with plastic wrap, pressing it gently against the surface to prevent a skin from forming on the top layer. This dessert stays perfectly fresh for up to 3 days in the refrigerator—though I’ve rarely seen it last that long in my house! For the best presentation, wait to add any decorative toppings like chocolate shavings or fresh fruit until just before serving. If you notice the whipped topping starting to weep slightly after day two, a quick dusting of cocoa powder or crushed Oreos refreshes the appearance instantly without affecting the delicious taste.
Solving Common Assembly Challenges
Even experienced cooks occasionally encounter issues with layered desserts. If your crust crumbles when serving, it likely needs more butter or firmer packing—next time, use a flat-bottomed glass to really compress the base. Runny pudding layers usually indicate insufficient chilling time between steps; I always allow 30 minutes minimum refrigeration after each layer. If cream cheese clumps appear, your ingredients weren’t at room temperature—a quick fix is to warm the mixture in 5-second microwave bursts, beating between each until smooth. For clean slices that showcase every beautiful layer, dip your knife in hot water and wipe clean between cuts. These simple solutions ensure picture-perfect results every time.
Frequently Asked Questions
Can I make No Bake Oreo Chocolate Lasagna ahead of time?
Absolutely! This dessert actually improves when made 12-24 hours ahead. The flavors meld beautifully and the textures soften slightly while still maintaining their distinct layers. Just cover tightly and refrigerate.
What can I substitute for whipped topping?
Freshly whipped heavy cream works perfectly. Beat 2 cups of cold heavy cream with 3 tablespoons of powdered sugar and 1 teaspoon vanilla until stiff peaks form. Fold gently into your layers as directed.
Can I freeze No Bake Oreo Chocolate Lasagna?
Yes, but with caution. Freeze for up to 2 weeks, tightly wrapped. Thaw overnight in the refrigerator. The texture may change slightly, with the cream layers becoming a bit less fluffy.
How do I prevent my crust from getting soggy?
Create a barrier by brushing melted chocolate over your pressed Oreo crust. Let it harden completely in the refrigerator before adding the cream cheese layer. This seals the crust beautifully.
Can I use different flavors of Oreos?
Definitely! Golden Oreos create a lovely vanilla base, while mint or peanut butter varieties add exciting flavor twists. Just keep the total amount of cookies consistent with the original recipe.
Final Thoughts
This No Bake Oreo Chocolate Lasagna has become my signature dessert for good reason—it strikes that perfect balance between impressive and achievable. The joy on people’s faces when they take that first bite of creamy, chocolatey goodness makes every simple step worthwhile. I love how it brings together classic flavors in a modern, layered presentation that feels special without being fussy. Whether you’re a seasoned baker or kitchen novice, this dessert delivers reliable wow-factor every time. Find more of my favorite dessert creations on Pinterest and keep creating sweet memories!