
Desserts
Classic Peanut Butter Lunch Lady Cookie Bars – Irresistibly Soft & Delicious!
Jump to Recipe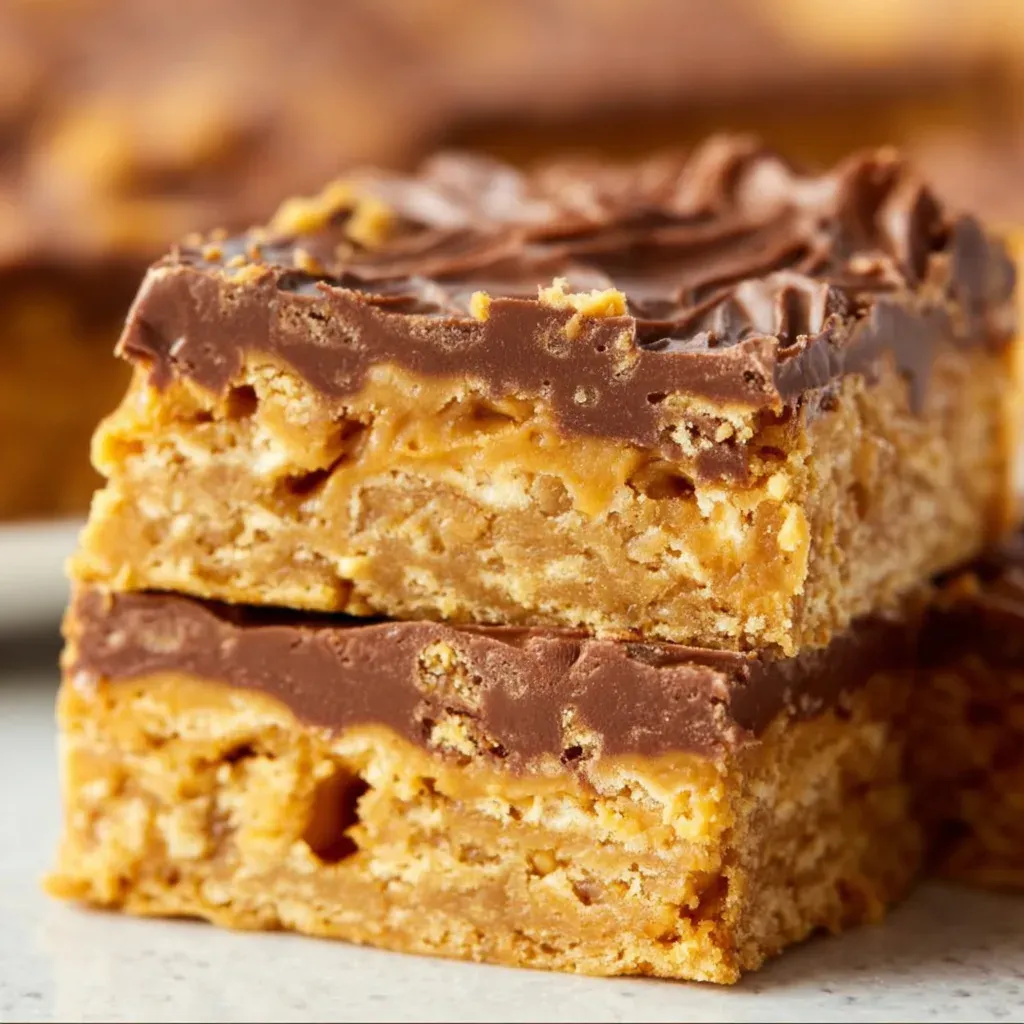
Classic Peanut Butter Lunch Lady Cookie Bars – Irresistibly Soft & Delicious!
Ingredients
- 1 cup unsalted butter, softened
- 1 cup granulated sugar
- 1 cup packed light brown sugar
- 1 cup creamy peanut butter
- 2 large eggs
- 2 teaspoons vanilla extract
- 3 cups all-purpose flour
- 1 teaspoon baking soda
- 1/2 teaspoon salt
- 1/2 cup creamy peanut butter, for the frosting
- 1/4 cup unsalted butter, softened, for the frosting
- 2 cups confectioners’ sugar, for the frosting
- 3 to 4 tablespoons milk, for the frosting
- 1 teaspoon vanilla extract, for the frosting
Instructions
- Heat the oven to 350°F (175°C) and grease an 18-by-13-inch half sheet pan.
- In a large bowl, beat the butter, granulated sugar, brown sugar and 1 cup peanut butter together until light, about 2 to 3 minutes. Beat in the eggs one at a time, then the vanilla.
- Whisk the flour, baking soda and salt together, add them on low speed and mix only until no flour remains.
- Press the dough evenly into the pan. It is stiff, so work it out to the corners with damp hands or the back of a spoon.
- Bake 18 to 22 minutes, until the edges are golden and the centre is just set. Do not bake until the middle looks firm — these set as they cool, and overbaking makes them dry.
- Cool completely in the pan, about 1 hour. Frosting a warm base will slide straight off.
- For the frosting, beat the 1/2 cup peanut butter with the 1/4 cup butter until smooth, then beat in the confectioners’ sugar and vanilla. Add the milk a tablespoon at a time until the frosting spreads easily.
- Spread the frosting over the cooled base and cut into squares.
Classic Peanut Butter Lunch Lady Cookie Bars transport me straight back to elementary school cafeteria days, where these chewy, peanutty squares were the highlight of lunch period. There’s something magical about that perfect balance of dense, buttery cookie base and sweet, creamy frosting that makes these treats utterly irresistible. I still remember trading half my sandwich just to score an extra bar! These nostalgic treats combine the comfort of homemade cookies with the ease of a one-pan dessert that’s perfect for potlucks, bake sales, or simply satisfying those weeknight sweet cravings. Let’s recreate this cafeteria classic with a homemade twist!
Recipe
Why You’ll Love This Classic Peanut Butter Lunch Lady Cookie Bars
Nostalgic Flavor with Modern Appeal
These bars strike the perfect balance between nostalgic comfort and modern-day cravings. The peanut butter base delivers that warm, nutty flavor that wraps around you like a cozy blanket on a chilly evening. What makes these truly special is how the salt from the peanut butter cuts through the sweetness, creating a sophisticated flavor profile that appeals to both kids and adults alike. I’ve served these at everything from school functions to dinner parties, and they disappear within minutes, always accompanied by that familiar “mmm” of recognition and delight.
Quick Preparation, Maximum Impact
One of the greatest joys of these Classic Peanut Butter Lunch Lady Cookie Bars is their impressive simplicity. Unlike fussy desserts that require multiple bowls and complicated techniques, these bars come together in just one bowl for the base and another for the frosting. The entire process takes less than 15 minutes of active time, making them perfect for busy weeknights or last-minute gatherings. I’ve whipped these up countless times when unexpected guests announced they were “just stopping by,” and they always think I spent hours in the kitchen!
Essential Tips & Tricks
Perfecting the Base Texture
The secret to authentic lunch lady cookie bars lies in achieving that perfect chewy density that’s neither too cakey nor too dry. Room temperature ingredients are non-negotiable here—cold butter and eggs will create a different texture entirely. When mixing, beat until just combined; overmixing introduces too much air, resulting in a cakey texture rather than that signature dense chew. My personal trick? I use the back of a measuring cup to firmly press the dough into the pan, creating that compact, even layer that defines these nostalgic treats. These Cheesecake Brownie Bites use a similar technique for their perfect base.
Frosting Finesse
The crowning glory of these bars is undoubtedly the silky frosting that sets them apart from ordinary cookie bars. Temperature is crucial here—apply the frosting while the base is still warm (but not hot) to achieve that signature slight melt at the interface. This creates a beautiful bond between layers that’s impossible to resist. For the smoothest results, sift your powdered sugar before mixing to eliminate lumps. My grandmother taught me to add a tiny pinch of salt to the frosting to enhance the peanut butter flavor—it’s subtle but makes all the difference!
Serving Ideas & Creative Variations
Elevated Presentation Styles
Transform these humble bars into showstopping desserts with a few simple presentation tweaks. For casual gatherings, classic squares are perfect, but for more elegant occasions, try cutting them into slim rectangles and arranging them in a spiral on a cake stand. A light dusting of cocoa powder or a drizzle of melted chocolate adds visual interest. I once served these at a dinner party with a small scoop of vanilla bean ice cream and a warm chocolate sauce drizzle—guests were fighting over seconds! The versatility of these bars makes them perfect companions to these Banana Oatmeal Muffins for a complete dessert spread.
Flavor Twists and Add-ins
While the classic version is perfection, these bars welcome creative variations that maintain their nostalgic essence while introducing exciting new flavors. Try folding crunchy elements like chopped peanuts, chocolate chips, or toffee bits into the base for textural contrast. For a more sophisticated take, add a teaspoon of espresso powder to the frosting or swap half the peanut butter for cookie butter or Nutella. My personal favorite variation includes a thin layer of raspberry jam between the base and frosting—the sweet-tart berry flavor cuts through the richness beautifully.
Storage & Troubleshooting Guide
Optimal Storage Methods
Preserving the perfect chewy texture of these bars requires proper storage techniques. At room temperature, store them in an airtight container with parchment paper between layers for 3-4 days. For longer storage, refrigeration works beautifully—just bring them to room temperature before serving to restore that perfect chew. These bars also freeze exceptionally well for up to three months when wrapped individually in plastic wrap and stored in freezer bags. I often make a double batch specifically to freeze, ensuring I’m always prepared for unexpected company or late-night cravings!
Solving Common Challenges
Even experienced bakers occasionally encounter issues with these bars, but most problems have simple solutions. If your bars turn out too dry, you likely overbaked them—next time, remove them when the center still looks slightly underdone. For frosting that’s too runny, refrigerate it for 10-15 minutes before spreading. If your bars crack when cutting, try using a warm knife (run it under hot water and wipe dry between cuts) and cut while the bars are at room temperature. For clean, professional-looking squares, refrigerate the frosted bars for 30 minutes before cutting.
Frequently Asked Questions
Can I make Classic Peanut Butter Lunch Lady Cookie Bars without dairy?
Yes! Substitute plant-based butter and milk in both the base and frosting. The bars will have a slightly different texture but maintain that nostalgic flavor. Just ensure your dairy-free butter is at room temperature for proper creaming.
How do I know when the bars are properly baked?
Look for golden edges and a top that’s set but not overly browned. A toothpick inserted in the center should come out with a few moist crumbs—not wet batter but not completely clean either.
Can I use natural peanut butter in this recipe?
Traditional lunch lady cookie bars work best with conventional peanut butter (like Jif or Skippy). Natural peanut butter’s oil separation can affect texture and stability in both the base and frosting.
How far in advance can I make these for a party?
These bars actually improve with a day of rest! Make them up to 2 days ahead and store at room temperature in an airtight container, or freeze for up to 3 months and thaw overnight.
Why did my Classic Peanut Butter Lunch Lady Cookie Bars turn out cakey instead of chewy?
Overmixing the dough or using too much leavening agent creates a cakey texture. Mix just until ingredients are combined and double-check your measurements of baking powder and baking soda.
Final Thoughts
These Classic Peanut Butter Lunch Lady Cookie Bars aren’t just dessert—they’re edible nostalgia that bridges generations. There’s something profoundly satisfying about recreating these cafeteria favorites in your own kitchen, perhaps making them even better than you remember. Whether you’re baking them for a school function, family gathering, or simply because it’s Tuesday, these bars deliver that perfect blend of comfort, simplicity, and pure joy. I hope they bring as many smiles to your table as they have to mine! Find more inspiration on our Pinterest page.